Overview
Elai turns a written script into a finished video with an AI presenter, so you can produce interactive video without hiring a crew, renting a studio, or shooting anything. You can create engaging videos from your existing materials in a few clicks. Start from a template, build from scratch, or turn a topic, URL, script, PPTX, or PDF into a video automatically.
Teams use Elai for onboarding and training, course and lesson content, compliance briefings, product walkthroughs, internal announcements, sales and marketing videos, and personalized outreach at scale. Because the whole video is built from text, updating it later means editing a sentence and re-rendering rather than filming again, and you can translate the same video into 75+ languages to reach every audience you serve.
Elai videos support interactive elements such as quizzes, clickable buttons, and branching paths, so viewers make choices and answer questions as they go. That turns a passive video into an active one, providing real knowledge retention. Finished videos export to SCORM and drop straight into your LMS, and your Brand Kit keeps your logo, colors, fonts, and chosen voice consistent across every video and every platform you publish to.
Templates are the fastest way to get your first video made. A template is a ready-made video with the layout, avatar, background, fonts, and slide structure already set up, so all you need to supply is your own content. This article walks you through the whole process, from signing up to rendering the finished file.
Prerequisites
Verified account
Step 1: Start a New Video
Everything begins in your video library, which is where all of your projects live.
1. Log in to your Elai account.
2. Confirm your email address using the verification link Elai sends you. Learn How to Verify Your Elai Account.
3. Open the My videos tab, and click Create Now to open the Create new video window.
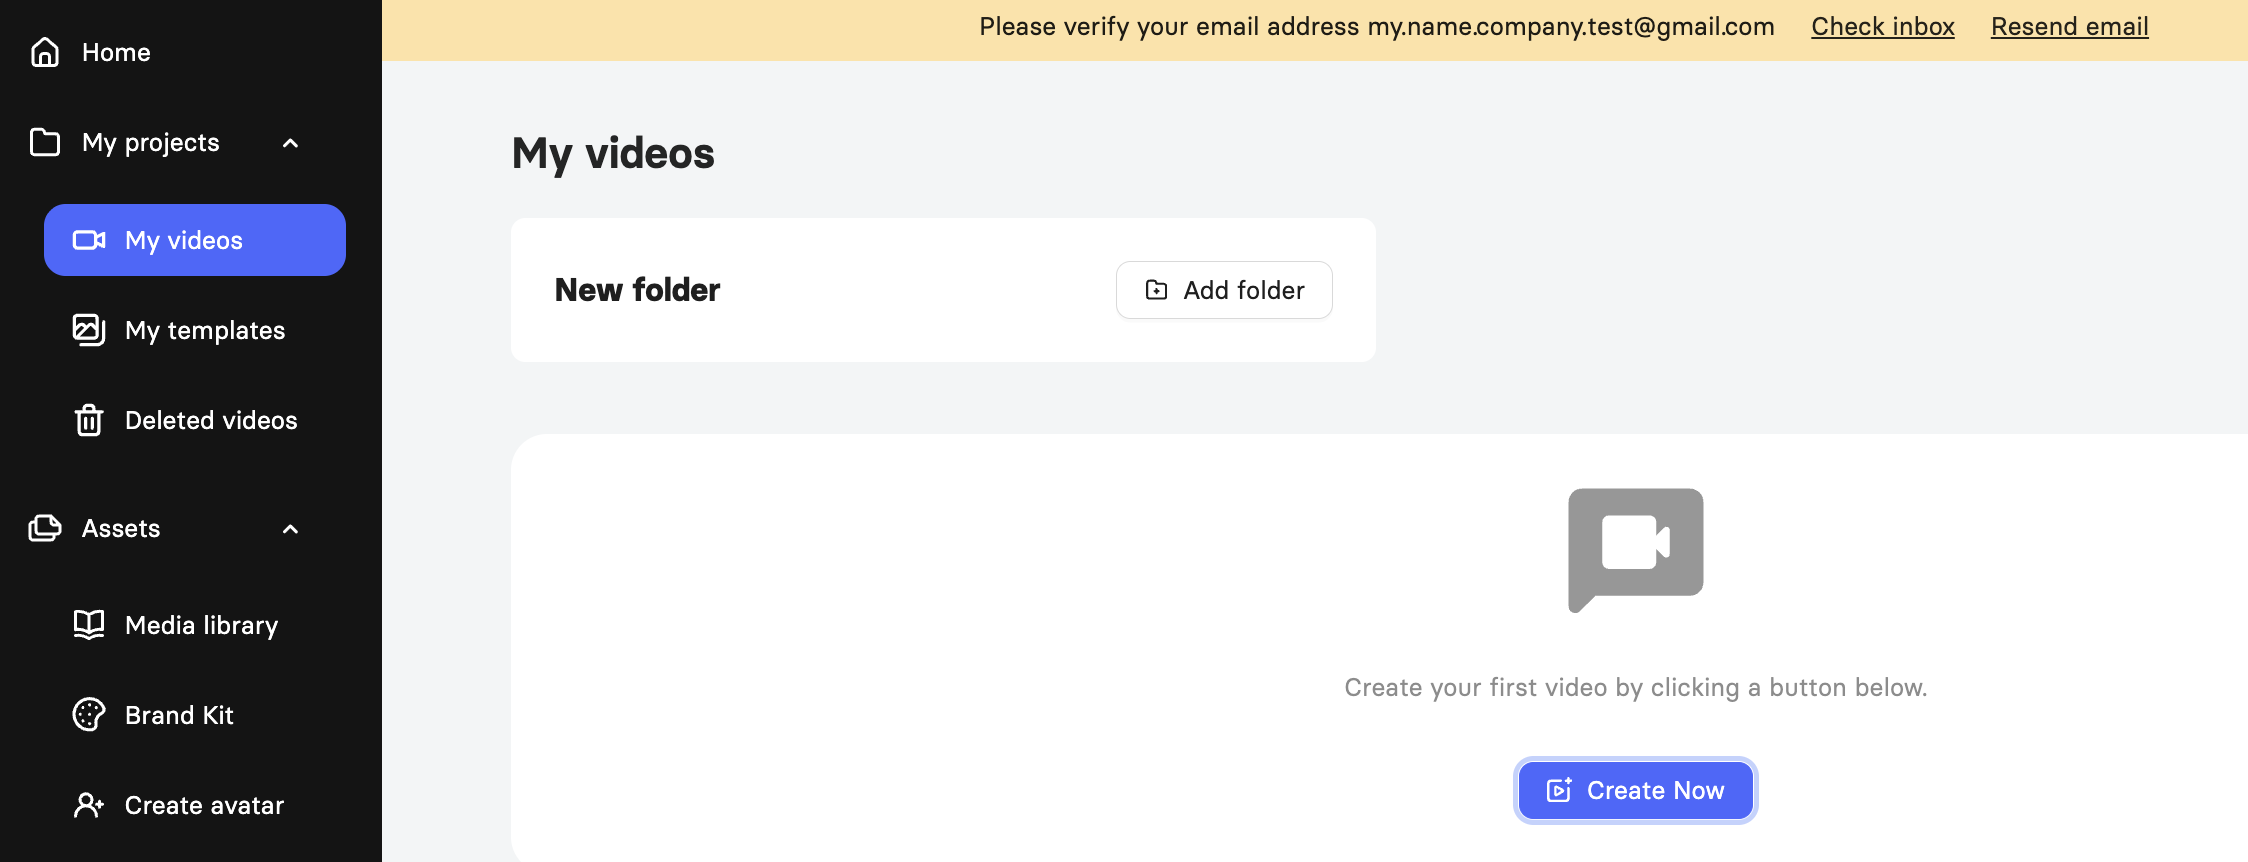
Note: You can click Add folder on the My videos tab to group related projects together as your library grows.
The Create new video window gives you three ways to start:
New video: Start blank or with a template. For details, see How to Create a Video From a Template.
Create with AI storyboard: Turn a topic, URL, or script into a video automatically. For details, see How to Create a Video With AI Storyboard.
Import from file: Convert an existing PPTX or PDF into a video. For details, see How to Create a Video From a PowerPoint or PDF File.
Let’s proceed with creating the video from a pre-designed template and editing it.
Step 2: Choose a Template
Elai provides a library of pre-built, fully branded templates covering common scenarios such as compliance briefings, marketing presentations, onboarding, claims walkthroughs, sales enablement, course introductions, and more. Every template is fully editable once you open it, so nothing you pick locks you in.
1. In the Create new video window, click All templates to browse the full library, or My templates to see templates saved to your workspace.
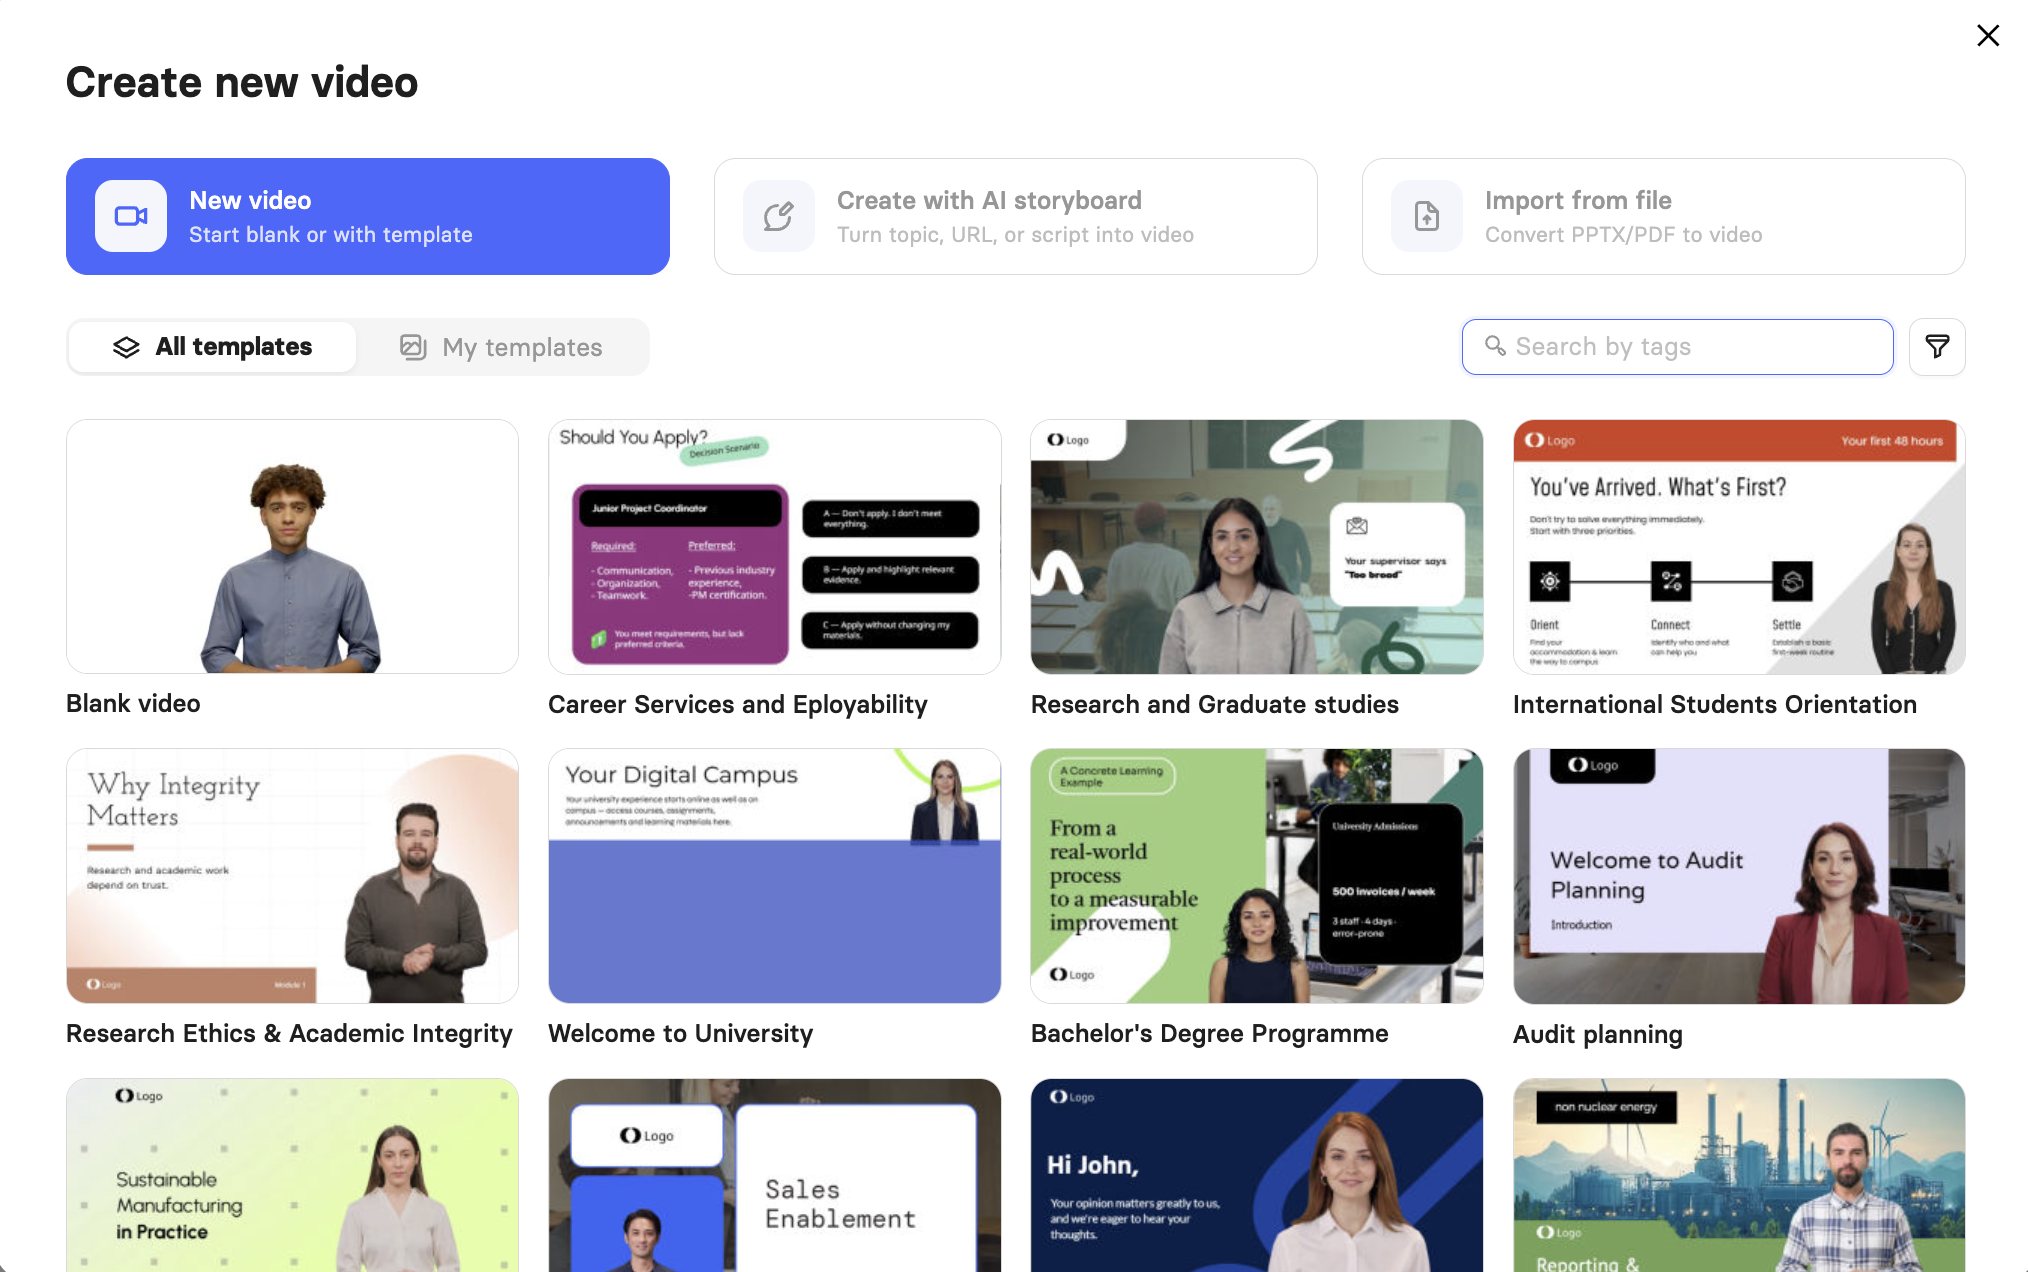
2. Click a template to preview it and choose Create video to open it in the video editor.
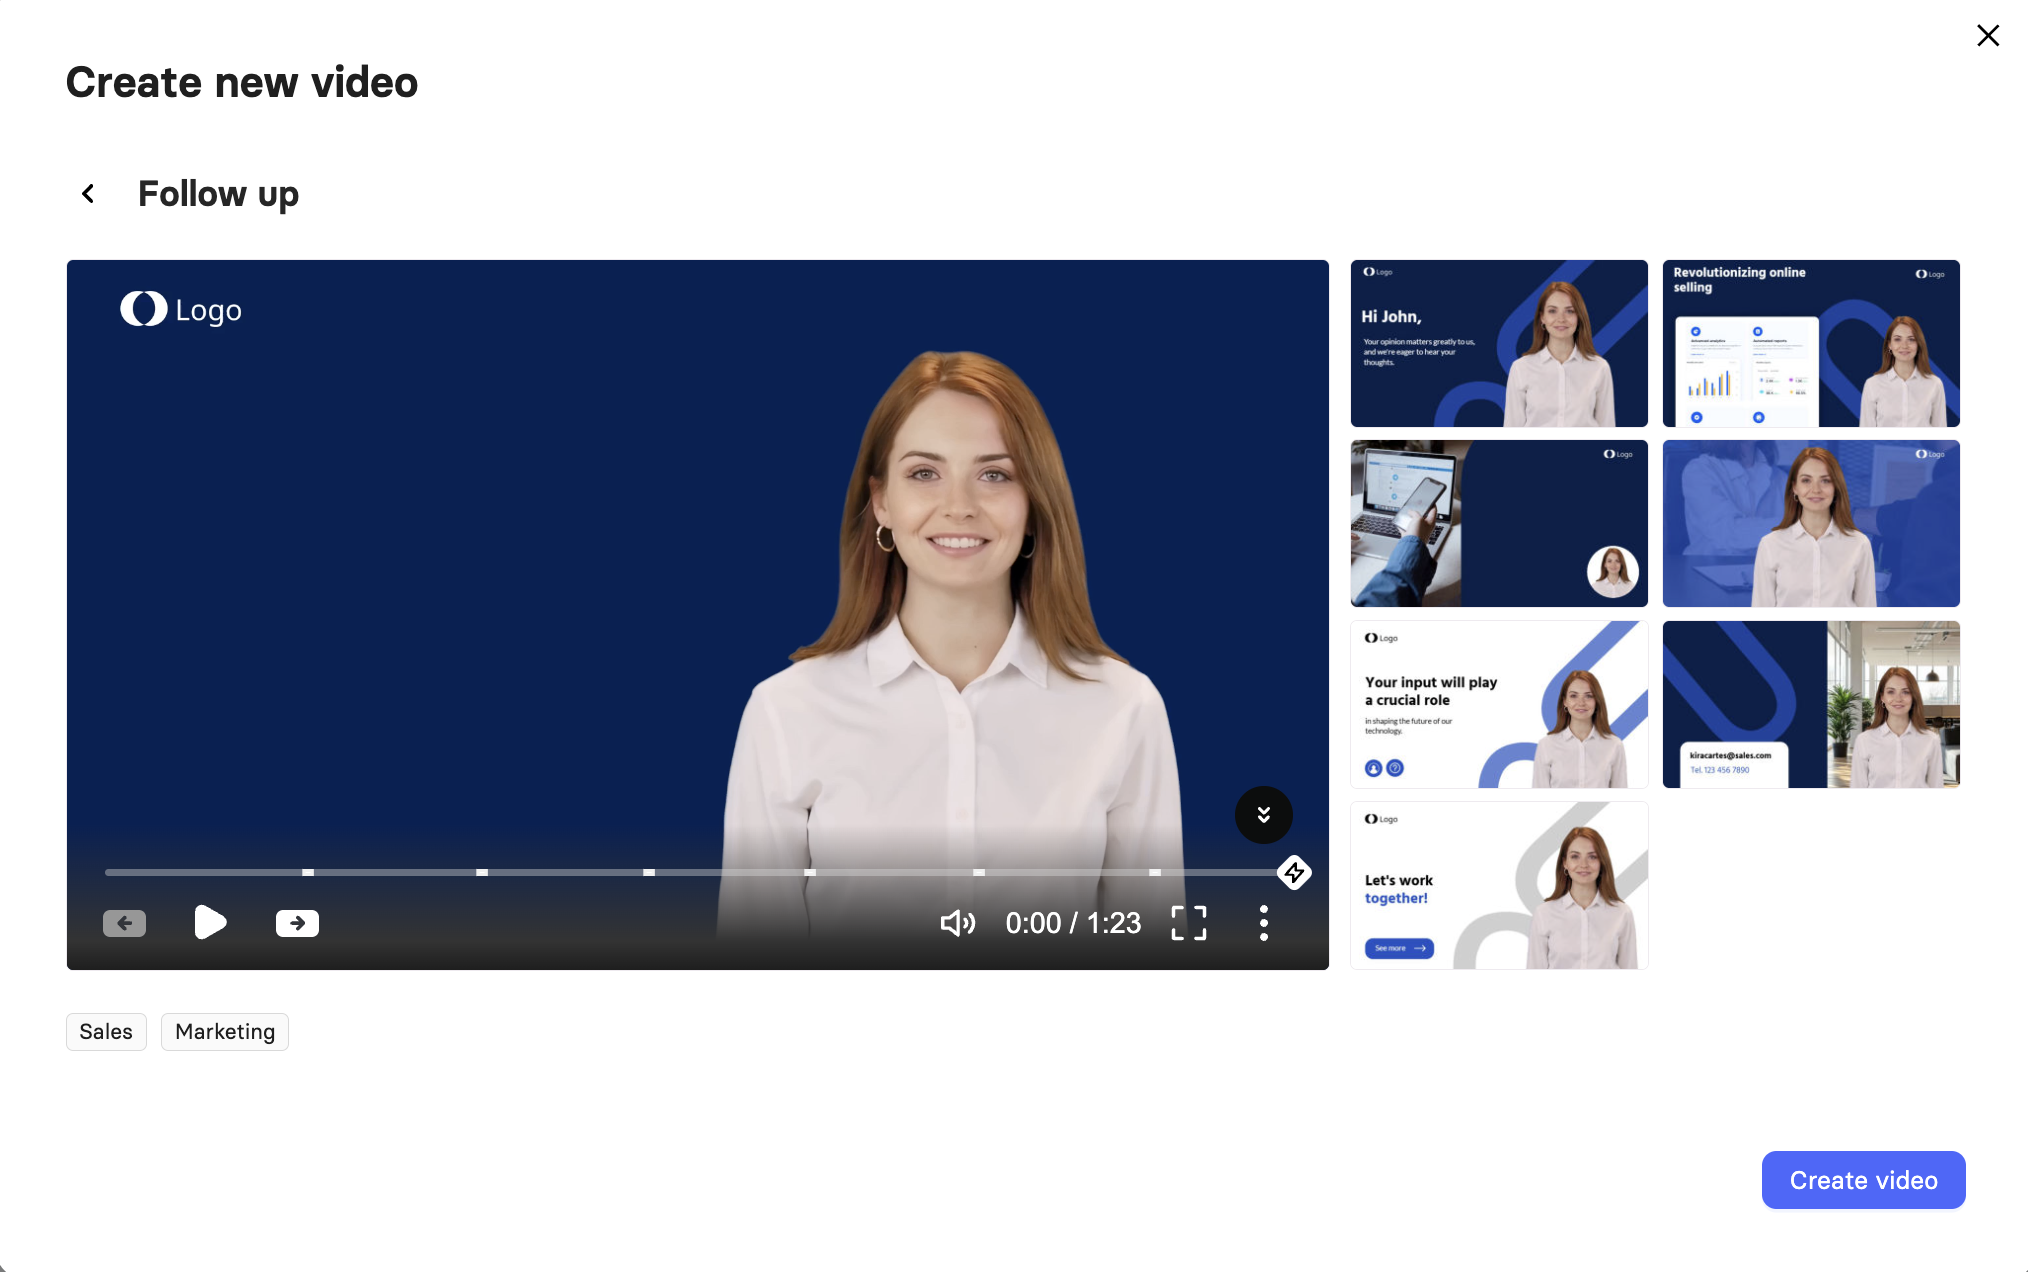
To filter the library by tag or dimension, use interactive templates with quizzes and branching built in, or build and publish your own branded template for your workspace; explore Learn About Elai Video Templates.
Step 3: Set Your Avatar and Speech
Your template opens in the editor with an avatar and placeholder content already in place. The Avatar tab on the right controls who presents, and the speech panel beneath the canvas controls what they say and how they say it.
Choose your avatar
1. Click the Avatar tab on the right sidebar.
2. Click Replace to open the avatar library.
3. Choose your avatar. Click Apply to all slides if you want the same presenter across the whole video.
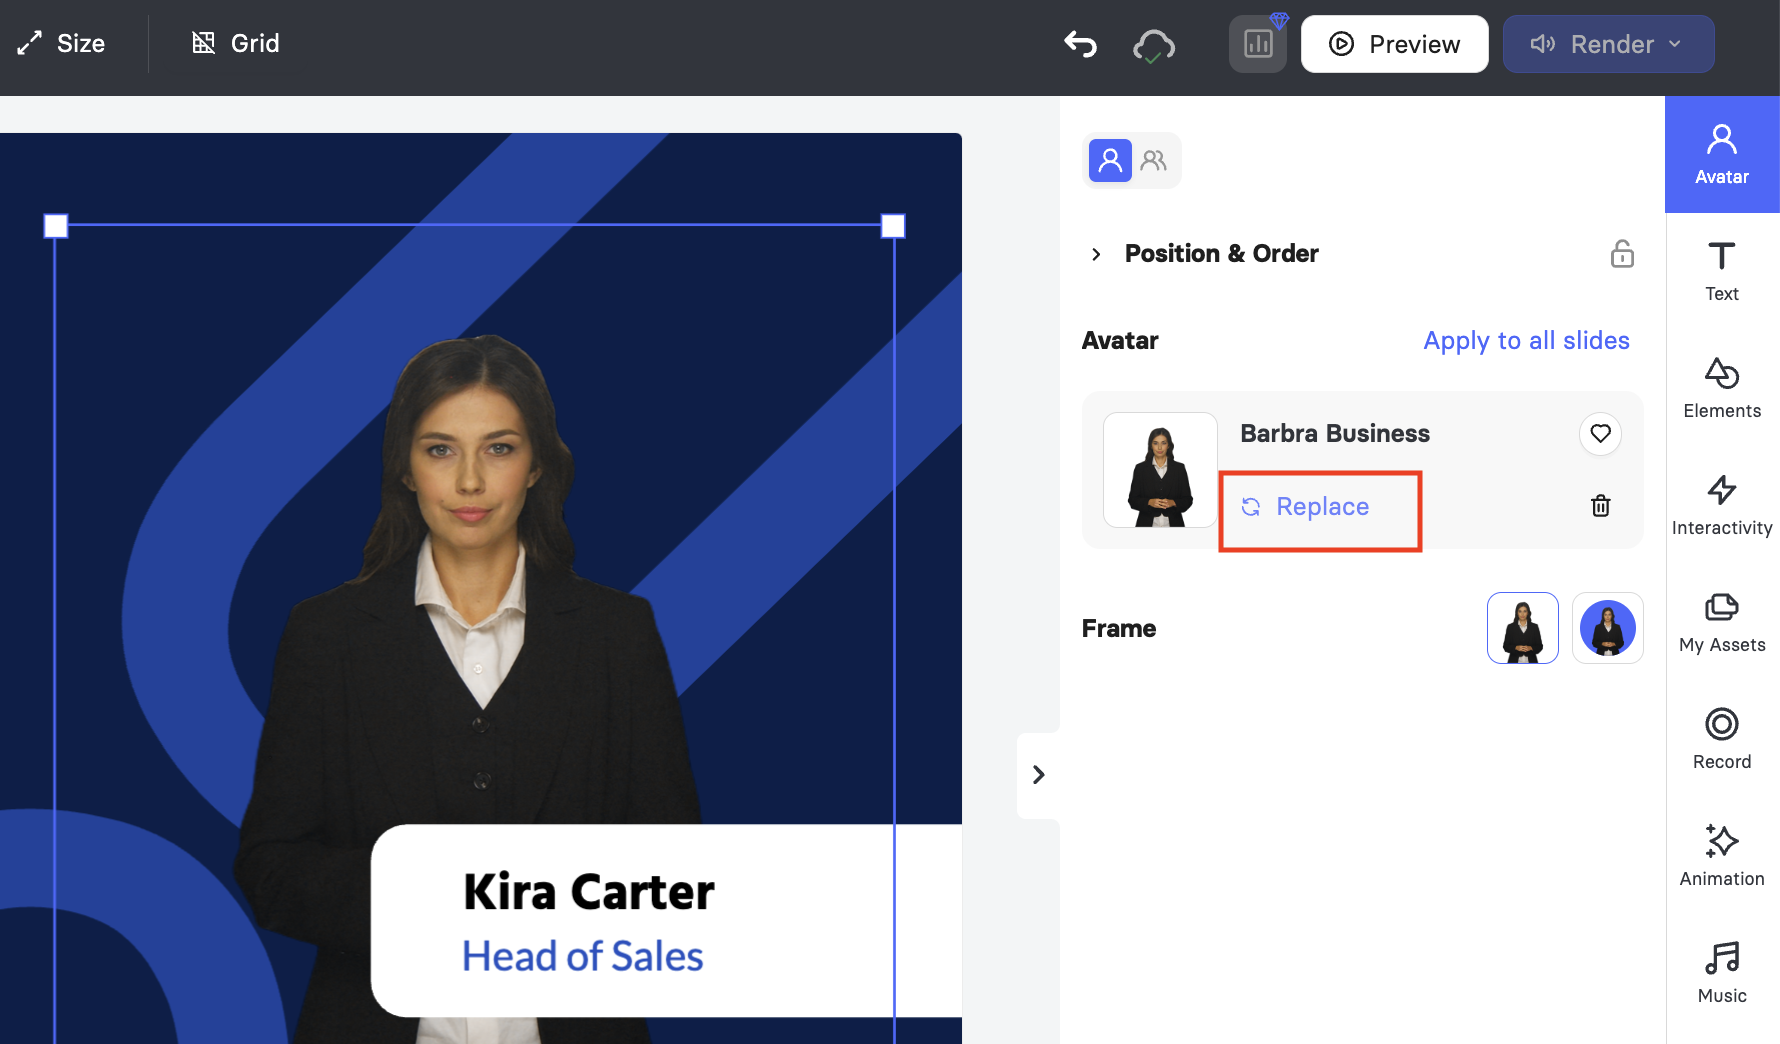
Note: Some avatars in the library are marked as premium and offer the highest quality available. You will need an Enterprise plan to render a video using one of them.
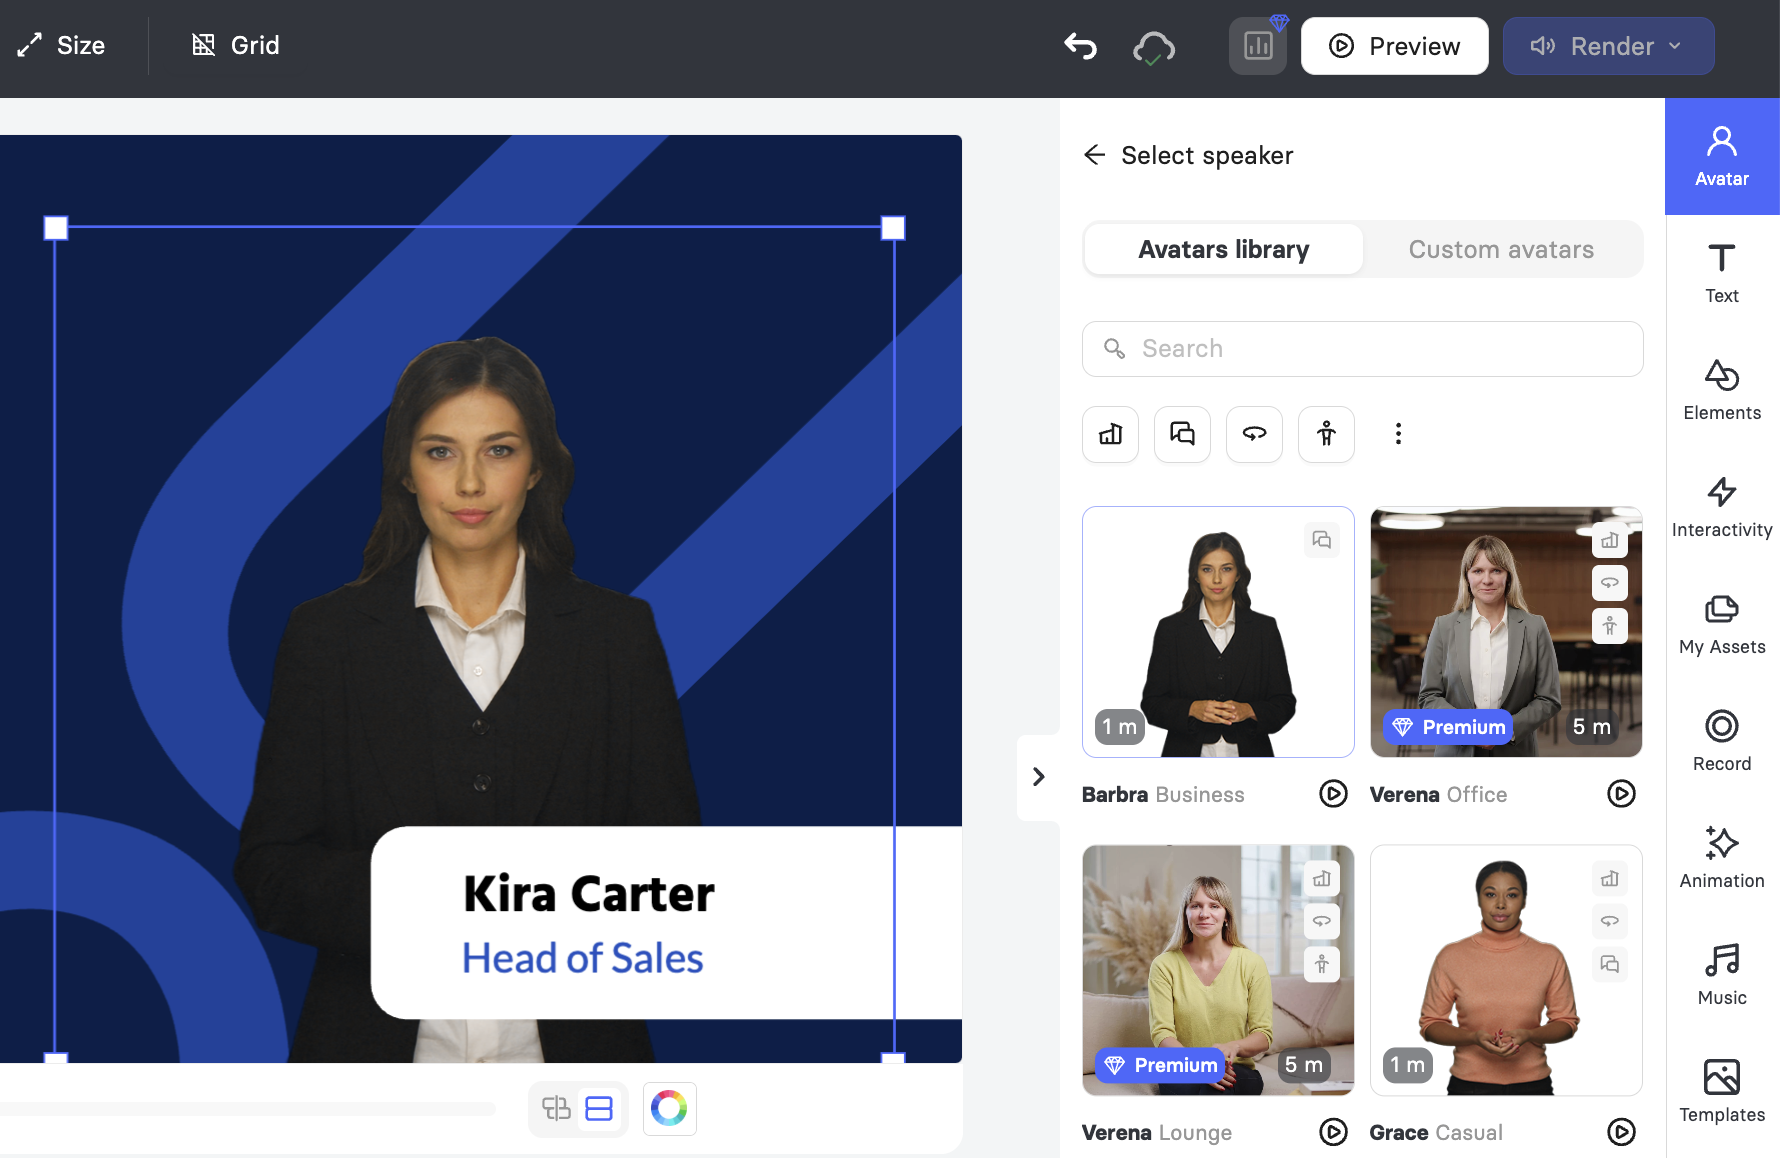
To position and resize your avatar, frame it in a circle, switch outfits, choose between scenario, dialogue, side, and body position avatars, or browse the full library of 600+ avatars from the home page, see How to Use Elai Avatars.
Add your speech
The speech panel sits directly beneath the canvas and offers three modes. Each slide has its own speech, and the counter above the field shows how much of your per-slide allowance you have used. The speech duration depends on the avatar of choice:
- Basic Avatars support up to 60 seconds of speech per slide.
- Premium Avatars support up to 300 seconds of speech per slide.
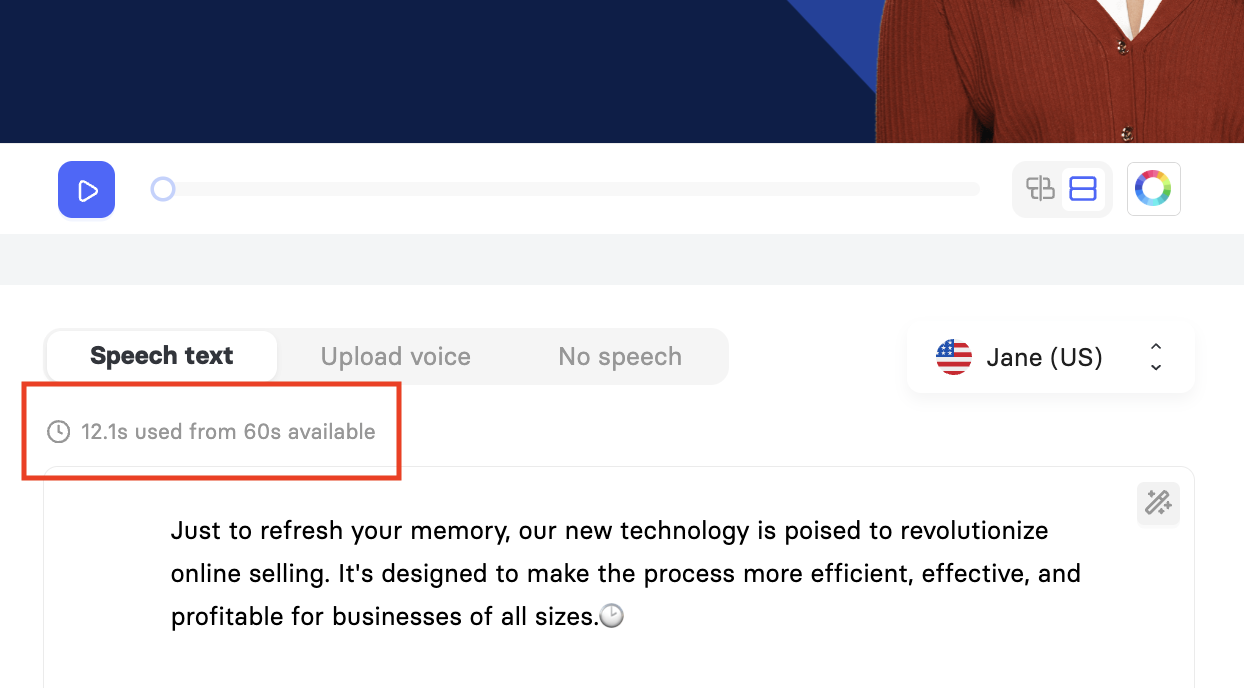
Speech text: Type or paste what the avatar should say, and Elai generates the voiceover from it. On the right, choose the language and voice.
Upload voice: Upload your own audio file and the avatar will lip-sync to it. Explore How to Upload Your Voice to the Elai Editor.
No speech: Use a silent slide and set how long it stays on screen with the Duration field.
To add the speech:
1. Click Speech text and type your script for the current slide.
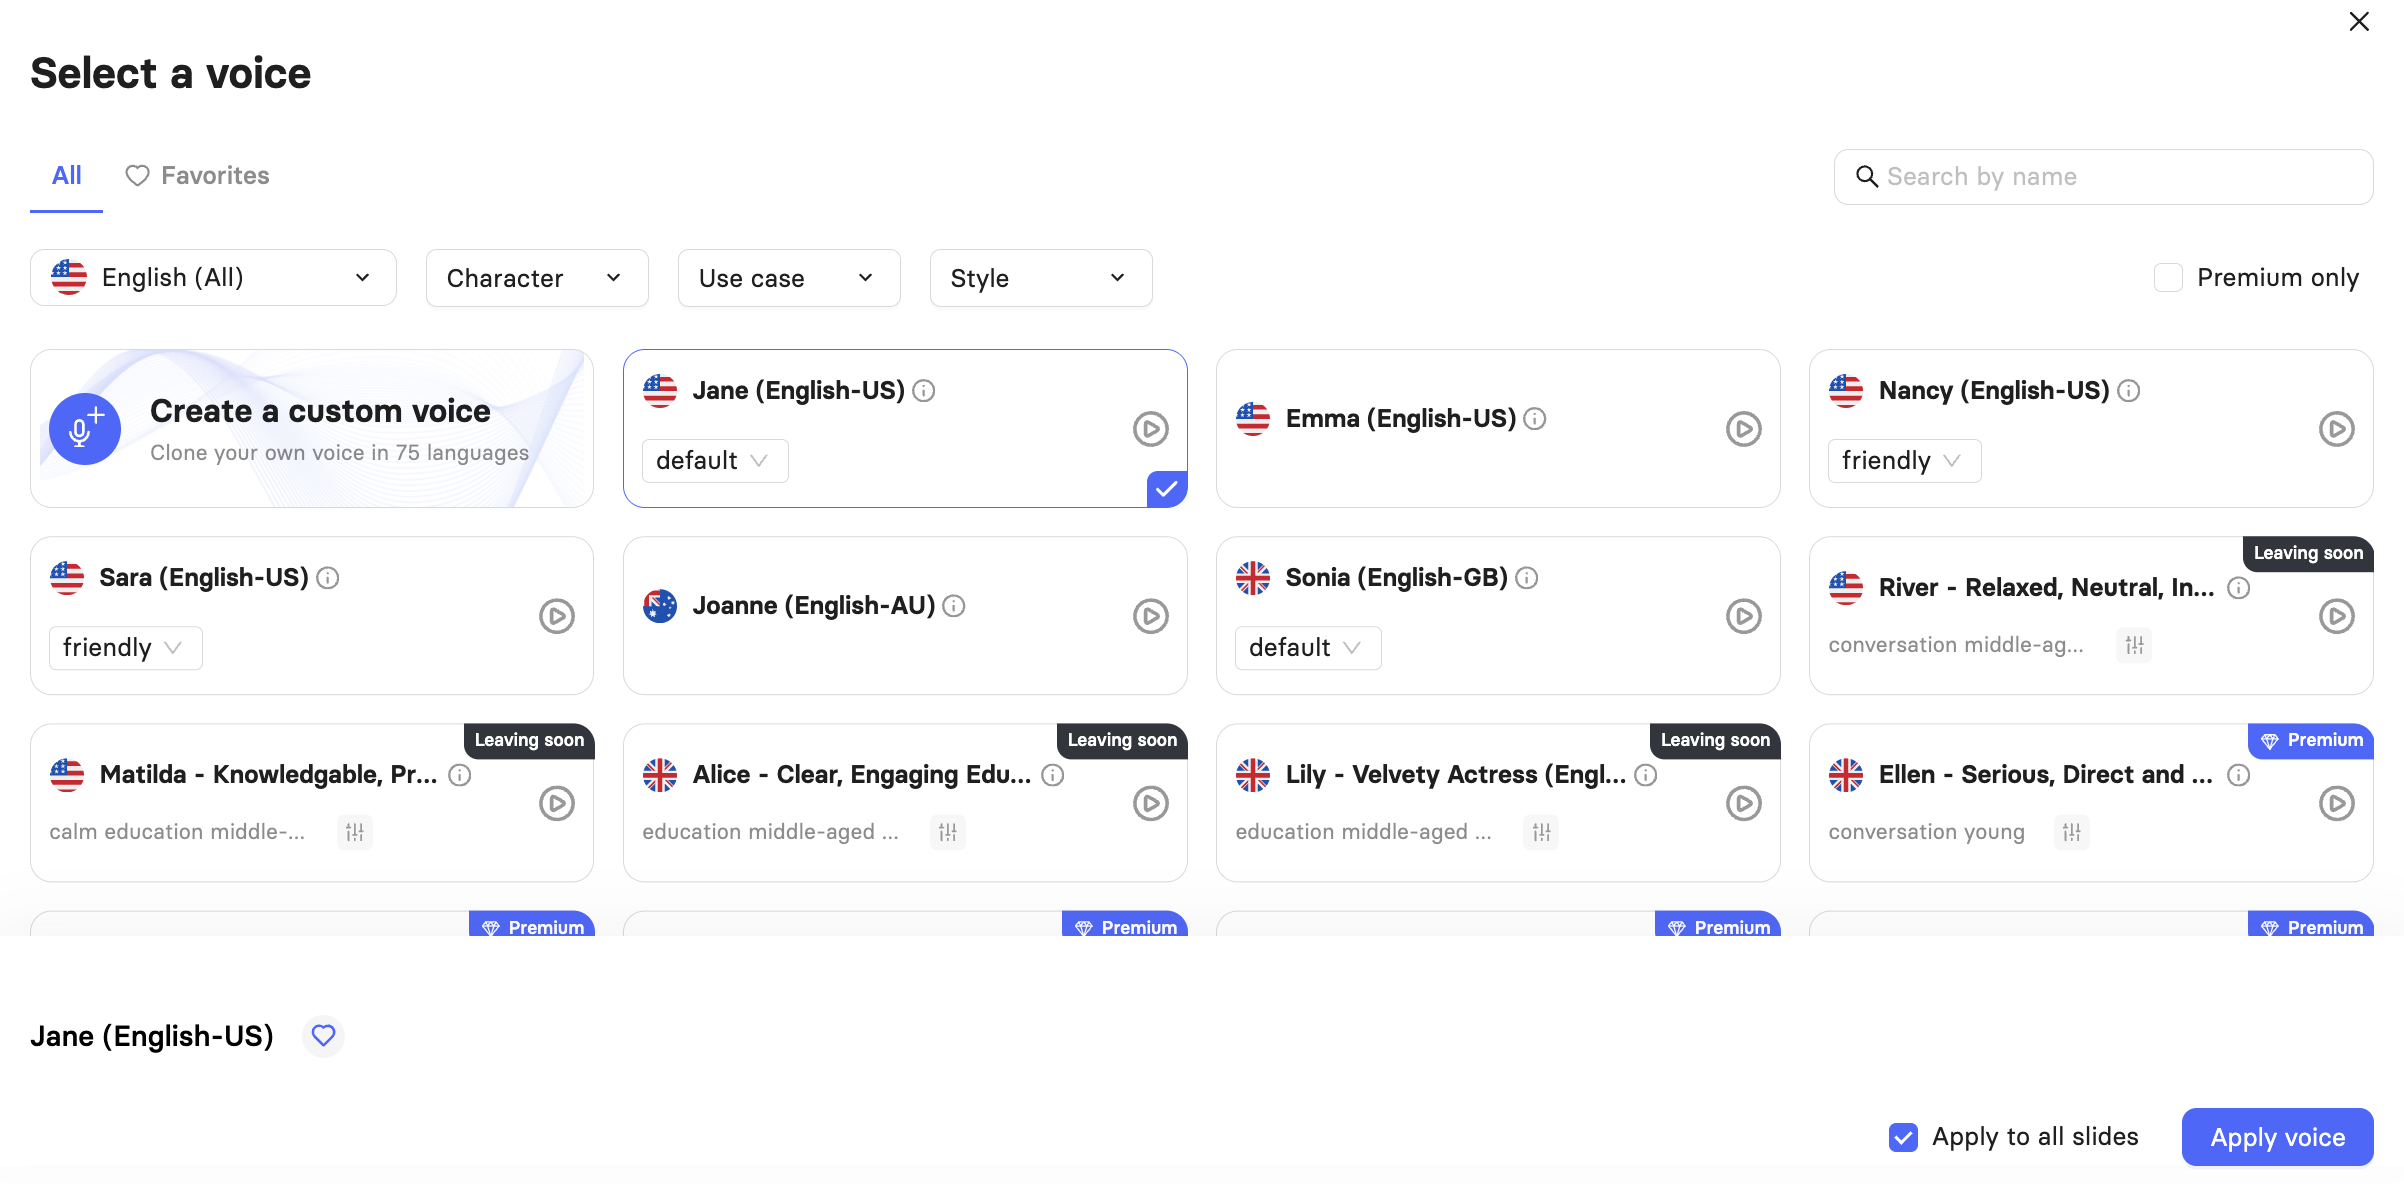
2. Click the voice selector to pick your language and voice.
3. Use Phoneme to correct how a specific word is pronounced, Pause to insert a deliberate break, and Mark to tag a point in the speech that an on-slide element can be synced to.
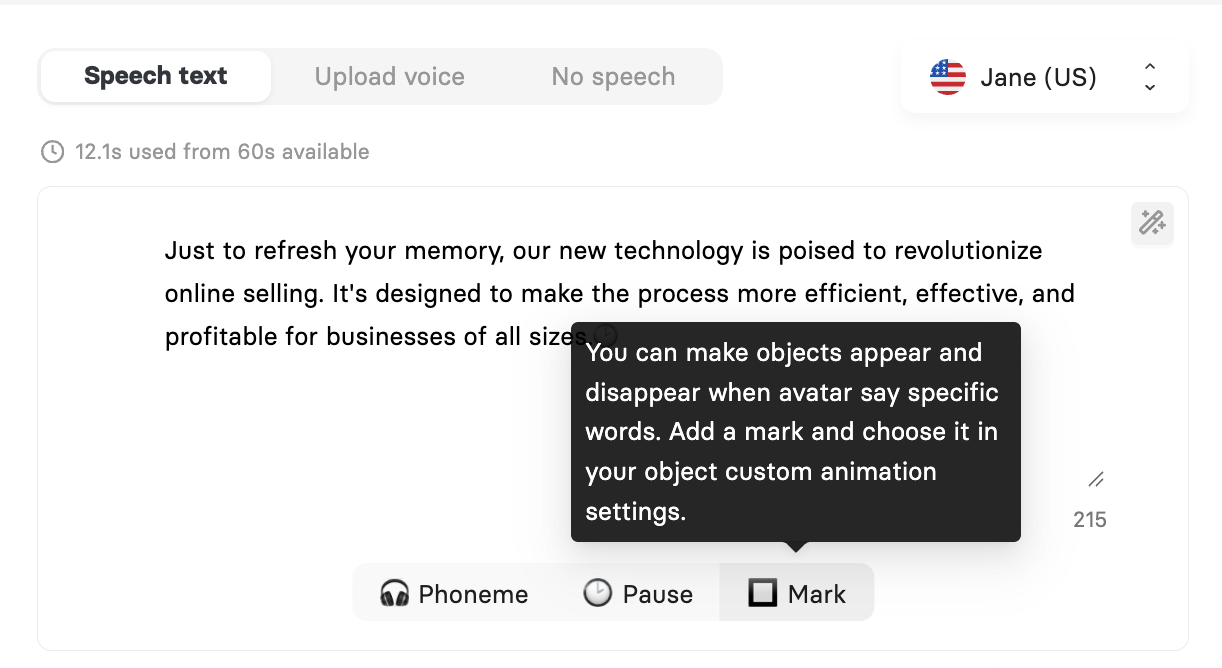
Note: For control over how individual words are pronounced, see How to Adjust Pronunciation with Phoneme Dictionary and SSML Tags. To sync on-slide elements to specific moments in the speech, see How to Sync Media Elements With Speech Marks.
Rewrite your script with AI
Elai can rewrite your script for you, adjusting its length or tone without you starting over.
1. Click the magic wand icon in the top corner of the speech field.
2. Describe the rewrite you want, or pick a preset such as Make shorter, More professional, or More engaging.
3. Click Apply, or choose Generate new speech for a fresh slide script.
Important! Rewriting removes any speech marks, phonemes, and pauses on the slide, and elements synced to those marks lose their timing.

Step 4: Customize Your Slide Content
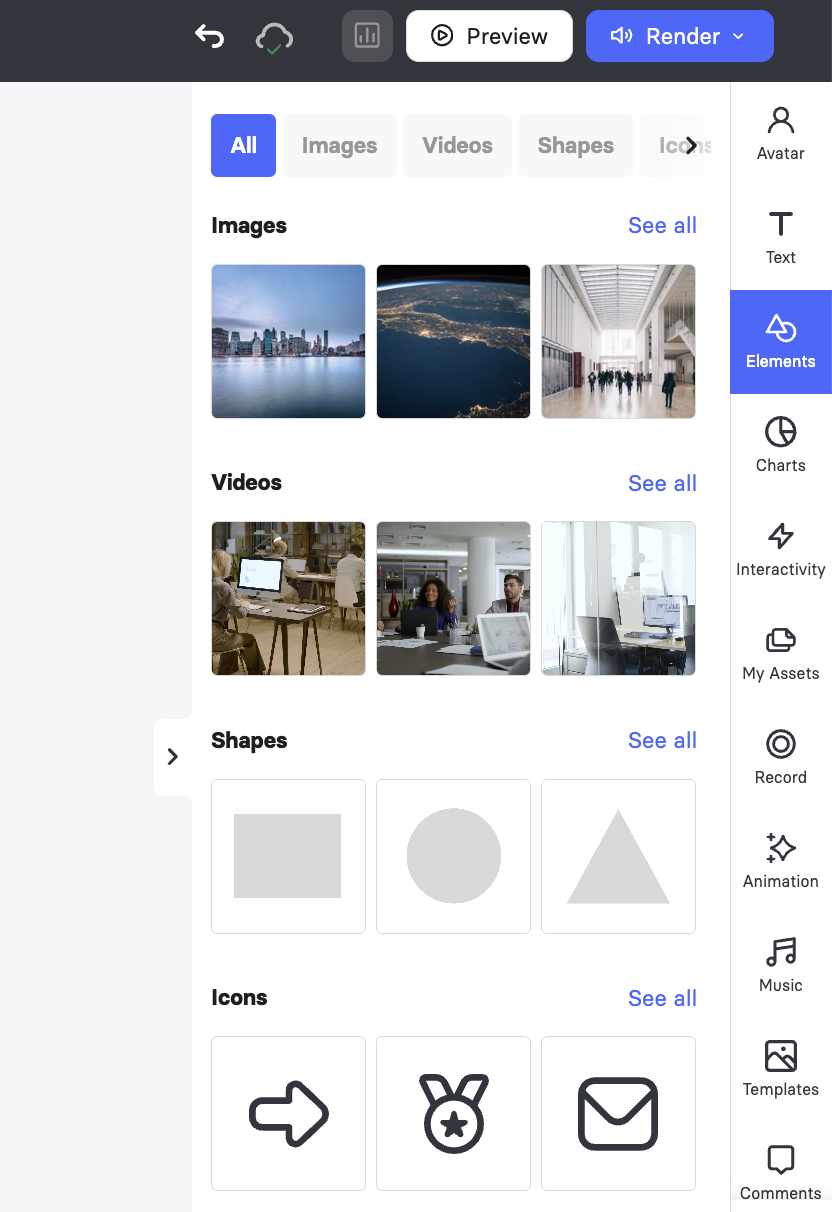
The right sidebar holds every tool for building the slide itself.
Text: Set the font, color, size, line height, and opacity for the selected text, and switch between list styles. To upload your own fonts, click Manage fonts in My Assets. For details, see How to Upload Custom Fonts.
Elements: Add images, videos, shapes, icons, stickers, GIFs, and Lottie animations from the built-in library, or generate an image with AI when nothing in the library fits. For details, see How to Add a Lottie Animation and Learn About AI Quiz Generation.
Charts: Generate an animated chart from the numbers in your slide's speech text or from a prompt you write. The chart is added as a native element, so it animates during playback and stays editable. For details, see Learn About AI Charts.
Interactivity: Turn your video into something viewers act on rather than sit through, with quizzes, clickable buttons, and branching paths. For details, see Learn About Interactive Elai Videos.
My Assets: Reach everything saved to your workspace across two tabs, Media library and Brand Kit. For details, see Learn About Brand Kit.
Record: Capture your screen and add the recording to your video instantly.
Animation: Apply an entrance or exit animation to the whole slide using the Enter and Exit tabs. To animate a single element instead, select the element first and then choose an animation.
Music: Add a soundtrack from the Stock Music library or upload your own track. For details, see How to Add Music to Your Video.
Templates: Apply a different template layout to the current slide at any point without leaving the editor.
Comments: Leave notes on the video for teammates reviewing your work.
Step 5: Manage Slides and Add Transitions
Your slides appear in order in the left panel, and the canvas always shows the slide you have selected. From this panel you can:
Open a slide: Click any slide in the panel to bring it onto the canvas.
Add a slide: Click Add slide at the bottom of the panel.
Duplicate or delete a slide: Hover over a slide and choose Duplicate slide or Remove slide.
Reorder slides: Drag a slide up or down in the panel.
Add a transition: Click the transition icon between two slides, pick a style such as Fade, then click Apply transition, or Apply to all to use the same one throughout.
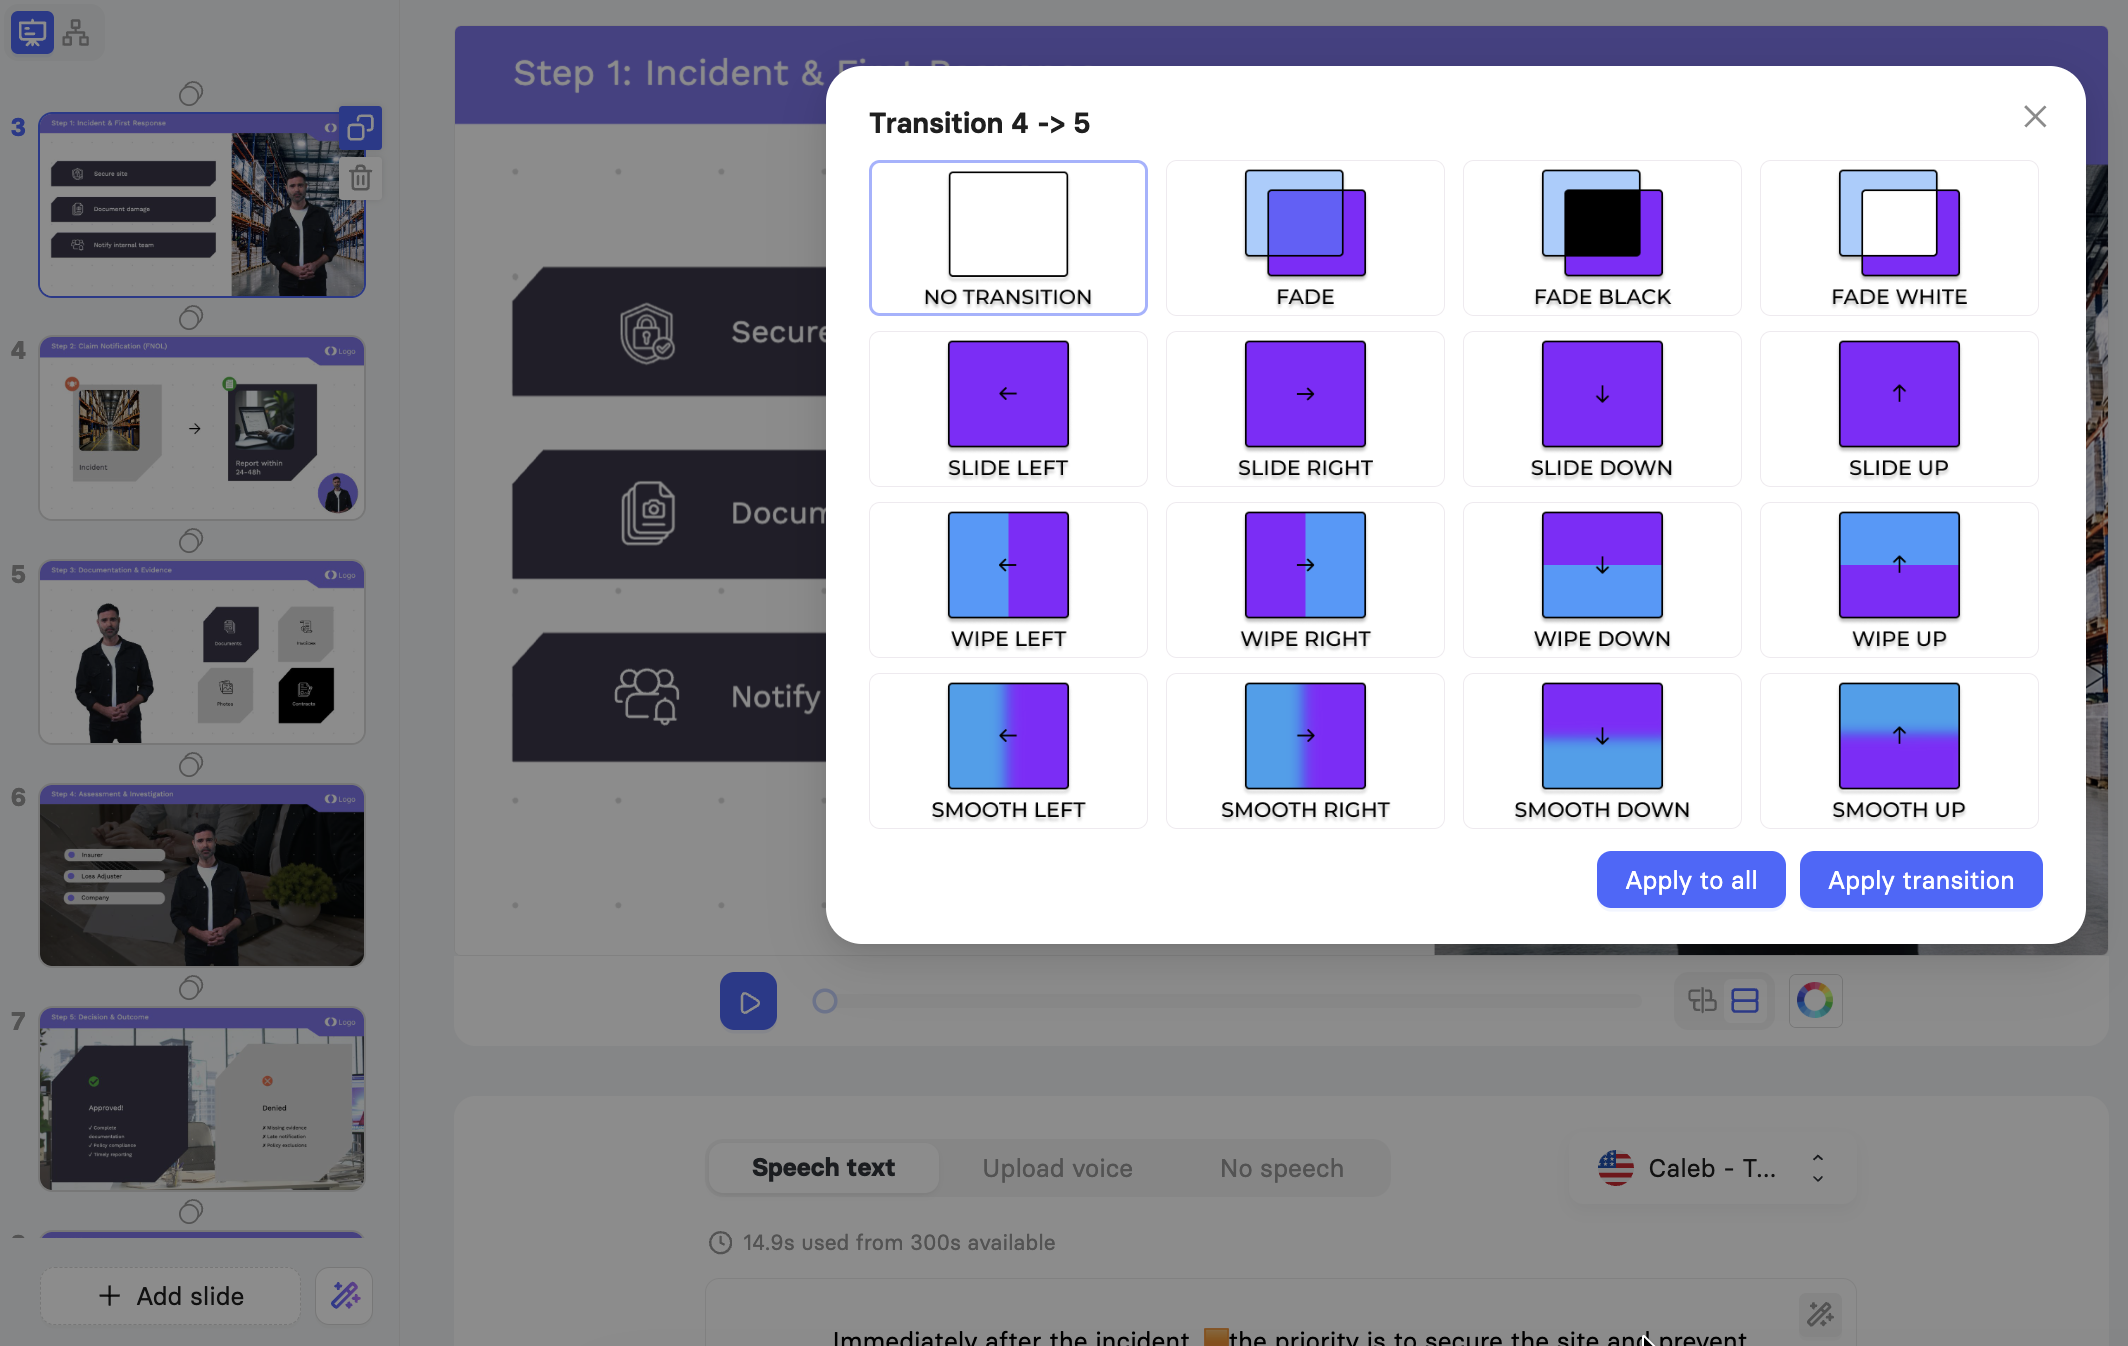
Important! Transitions do not appear in the slide preview or the video preview. Render your video to see them.
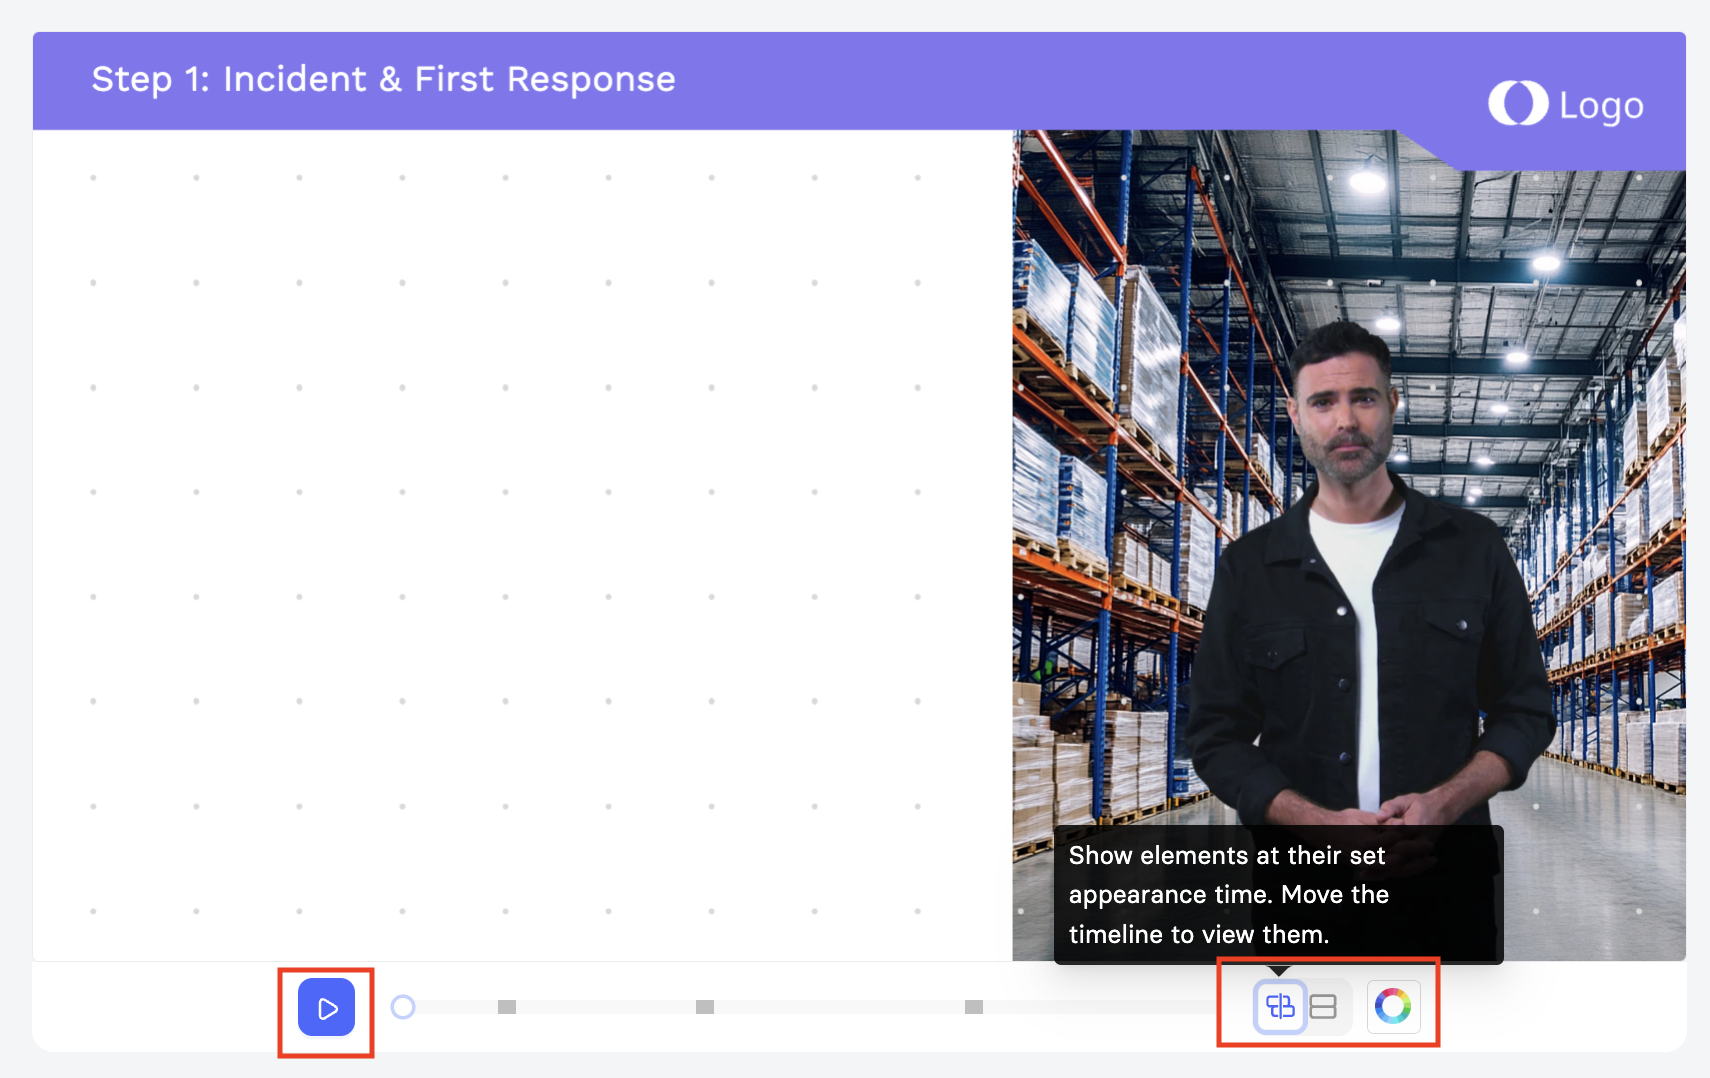
The canvas toolbar gives you a few more controls: preview the slide, change the slide background color, show elements at their set appearance time, or show every element at once regardless of timing, which helps while you are still arranging the layering of the elements on the slide.
Step 6: Preview and Render Your Video
Previewing lets you check your video before you spend any render minutes. Rendering produces the finished file.
From the top bar you can:
Undo and redo: Step back through your changes with the arrows.
Preview the video: Click Preview to watch the whole thing through, then return to the editor to adjust anything that does not sound or look right.
Render settings: Click Render when you are ready to produce the final file.
Important! The preview does not show everything. Your avatar will not speak or lip-sync, and transitions between slides will not play. Both appear only in the rendered video.
The render panel gives you these options before you start:
Minutes: Check Approximate video duration against Minutes left to confirm you have enough render minutes.
Subtitles: Turn Turn on subtitles on if you want captions, then choose a format.
Resolution: Choose 1080p or 4K.
Disable slide navigation: Restrict viewers to moving through the video with interactive elements only, rather than skipping ahead or jumping between chapters.
When your settings are set, click Start render.
Step 7: Share and Download Your Video
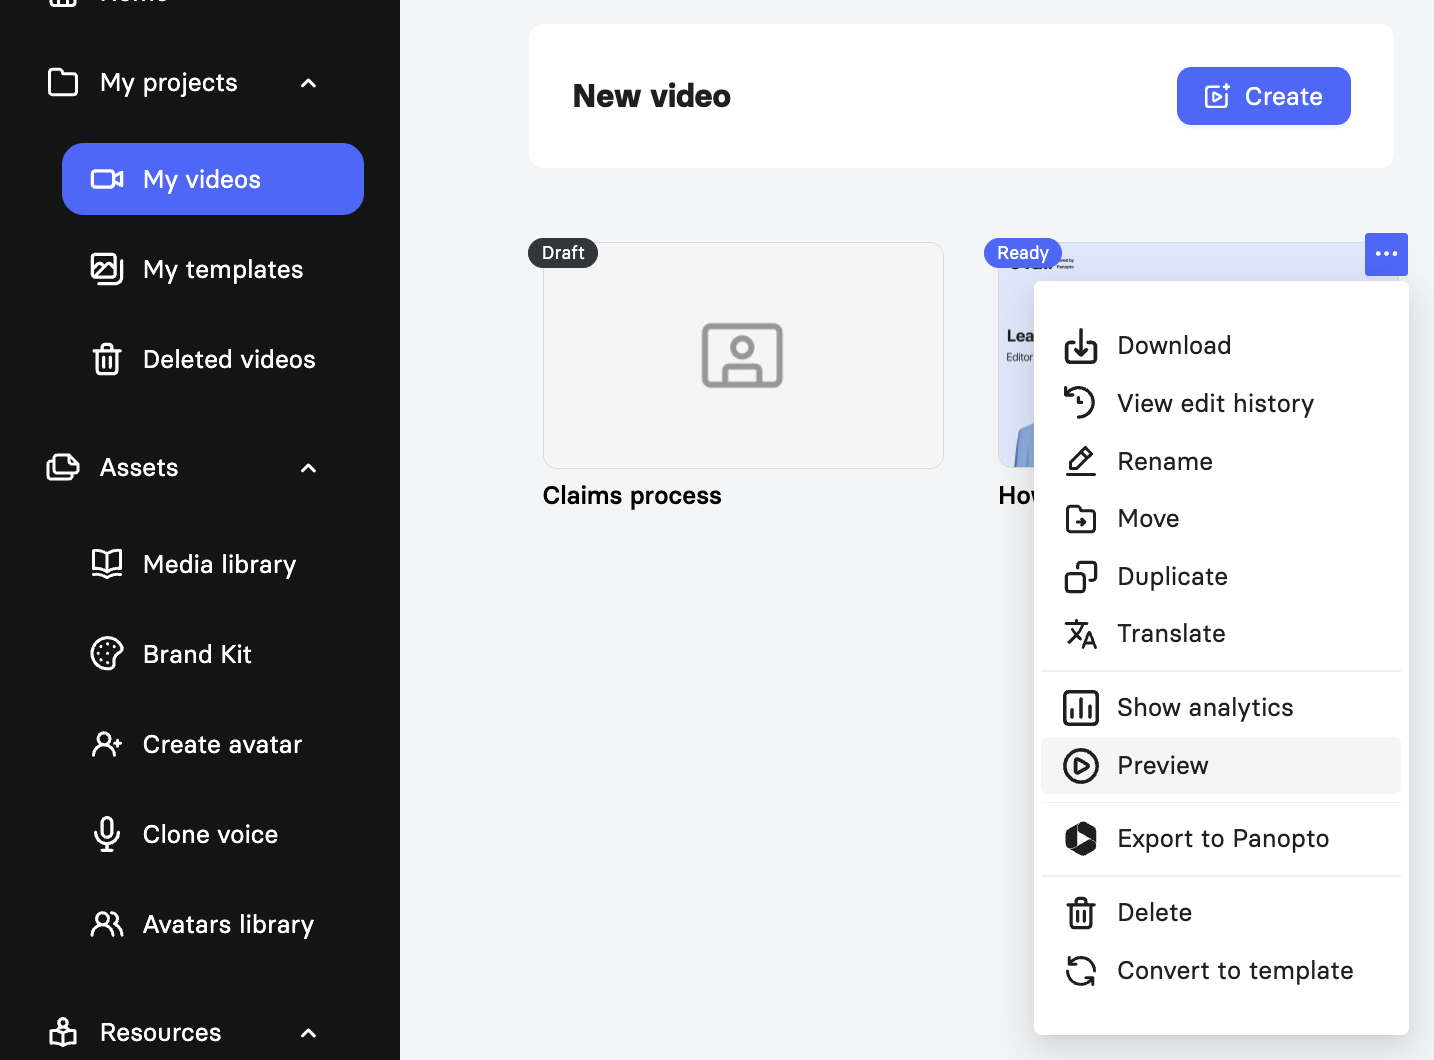
Once rendering finishes, your video appears in My videos with a Ready badge. Videos you have not rendered yet stay marked as Draft.
To open the finished video, hover over its card, click the three dots, and choose Preview. The preview page plays the final video with everything in place, including your avatar speaking and the transitions between slides.
From the preview page, you can:
Edit: Click Edit to reopen the video in the editor and make changes. Render again to produce an updated file.
Download: Click the download icon and choose Video MP4 or Audio MP3.
Share: Click Share, turn on Published, then use Copy link to send the video to viewers or Copy embed code to place it on your website.
Export SCORM: Under Download SCORM package, click Export SCORM to produce a package for your LMS. See Learn About SCORM Export.
Export to Panopto: Send the finished video straight to your Panopto library.
Comments: Switch to the Comments tab to leave notes for teammates, attached to a specific slide if you need.
Important! Interactive elements such as quizzes and buttons only work in the Elai player. They stay fully functional if you share the link or embed the video, but not in a downloaded MP4 file.
View video analytics
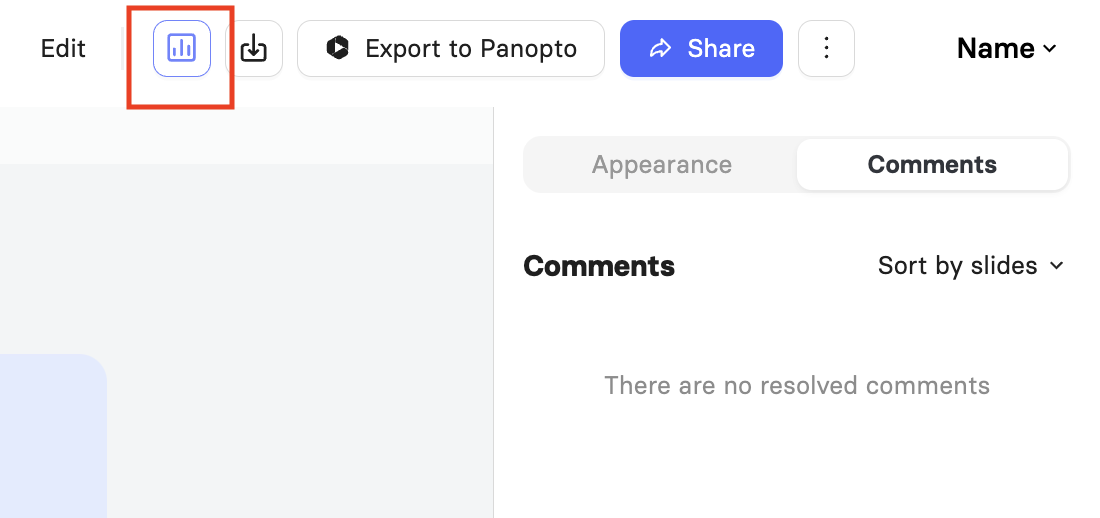
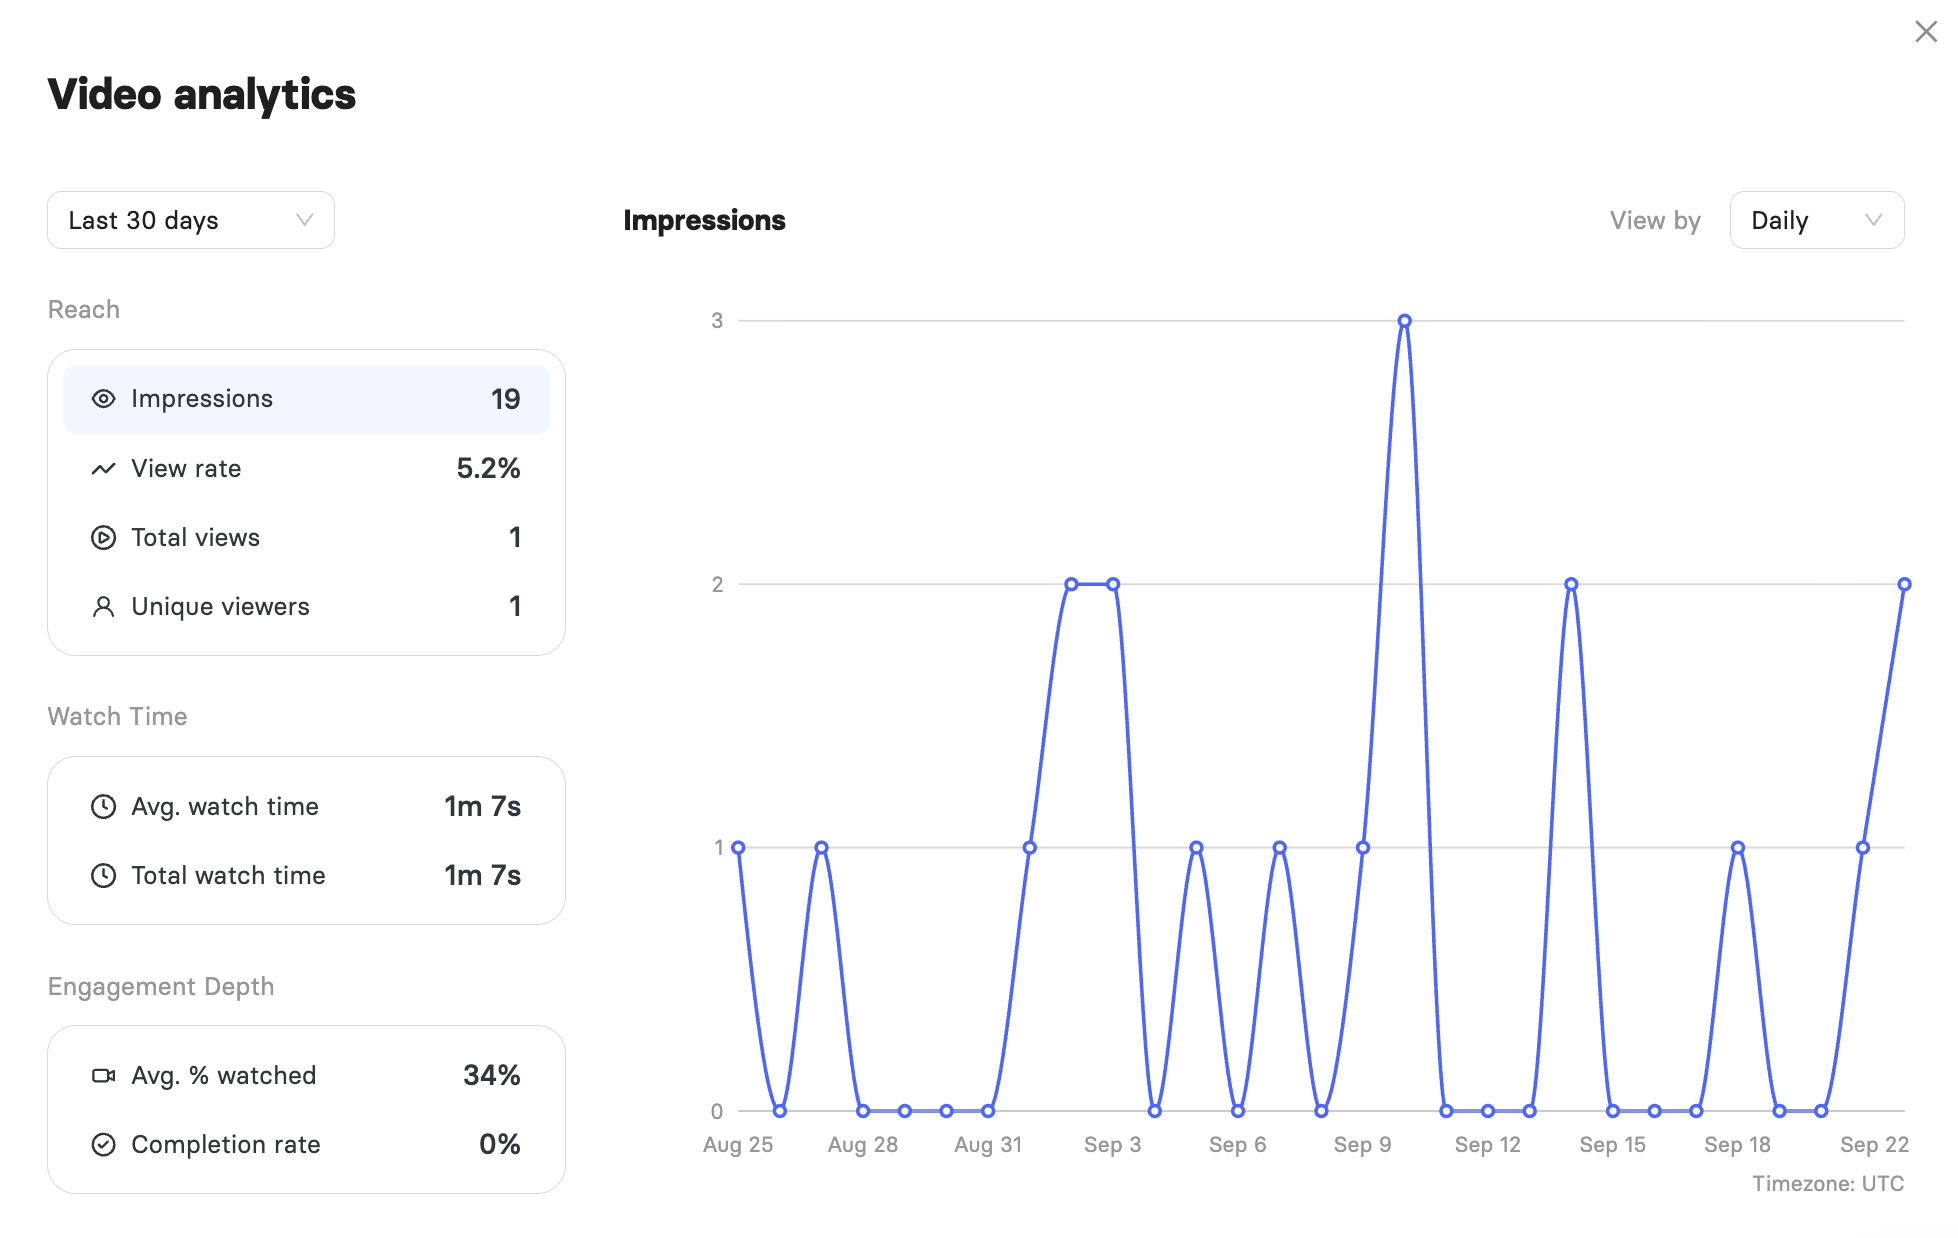
Click the analytics icon on the preview page to see how your video is performing over a period you select:
Reach: Impressions, view rate, total views, and unique viewers.
Watch Time: Average and total watch time.
Engagement Depth: Average percentage watched and completion rate.
FAQ
Can I edit a video after it has been rendered?
Yes. Open the video from My videos, make your changes, and render it again.
Why can I not see my transitions in the preview?
Transitions only appear in the rendered video. Preview shows the slides and speech but not the transitions between them.
How long can the speech on one slide be?
Each slide has its own speech allowance, shown above the speech field as seconds used out of seconds available.
Where do my deleted videos go?
They move to Deleted videos in the left sidebar. You can restore the files or permanently delete them.
Was this article helpful?
That’s Great!
Thank you for your feedback
Sorry! We couldn't be helpful
Thank you for your feedback
Feedback sent
We appreciate your effort and will try to fix the article